Outils pour utilisateurs
Ceci est une ancienne révision du document !
Table des matières
Plantes sonores et vidéos - Capteur capacitif interne à la carte Arduino
- Porteur(s) du projet : Justine Gendreau (DSAA DG2), Damien MUTI DESGROUAS (Prof. de Numérique)
- Date : 05/2021
- Contexte : Macroprojet - 2021
- Fichiers :
- Lien :
- Capteurs/Actionneurs :
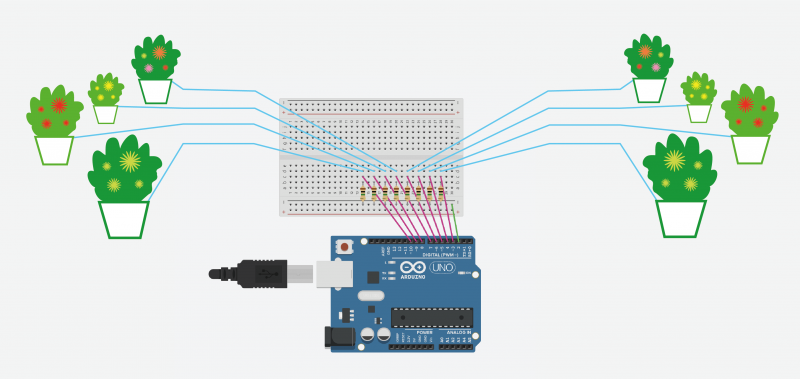
- Une seule carte Arduino Uno
- Résistances 1MO
- Fils
- 1 Bread Board
Intentions :
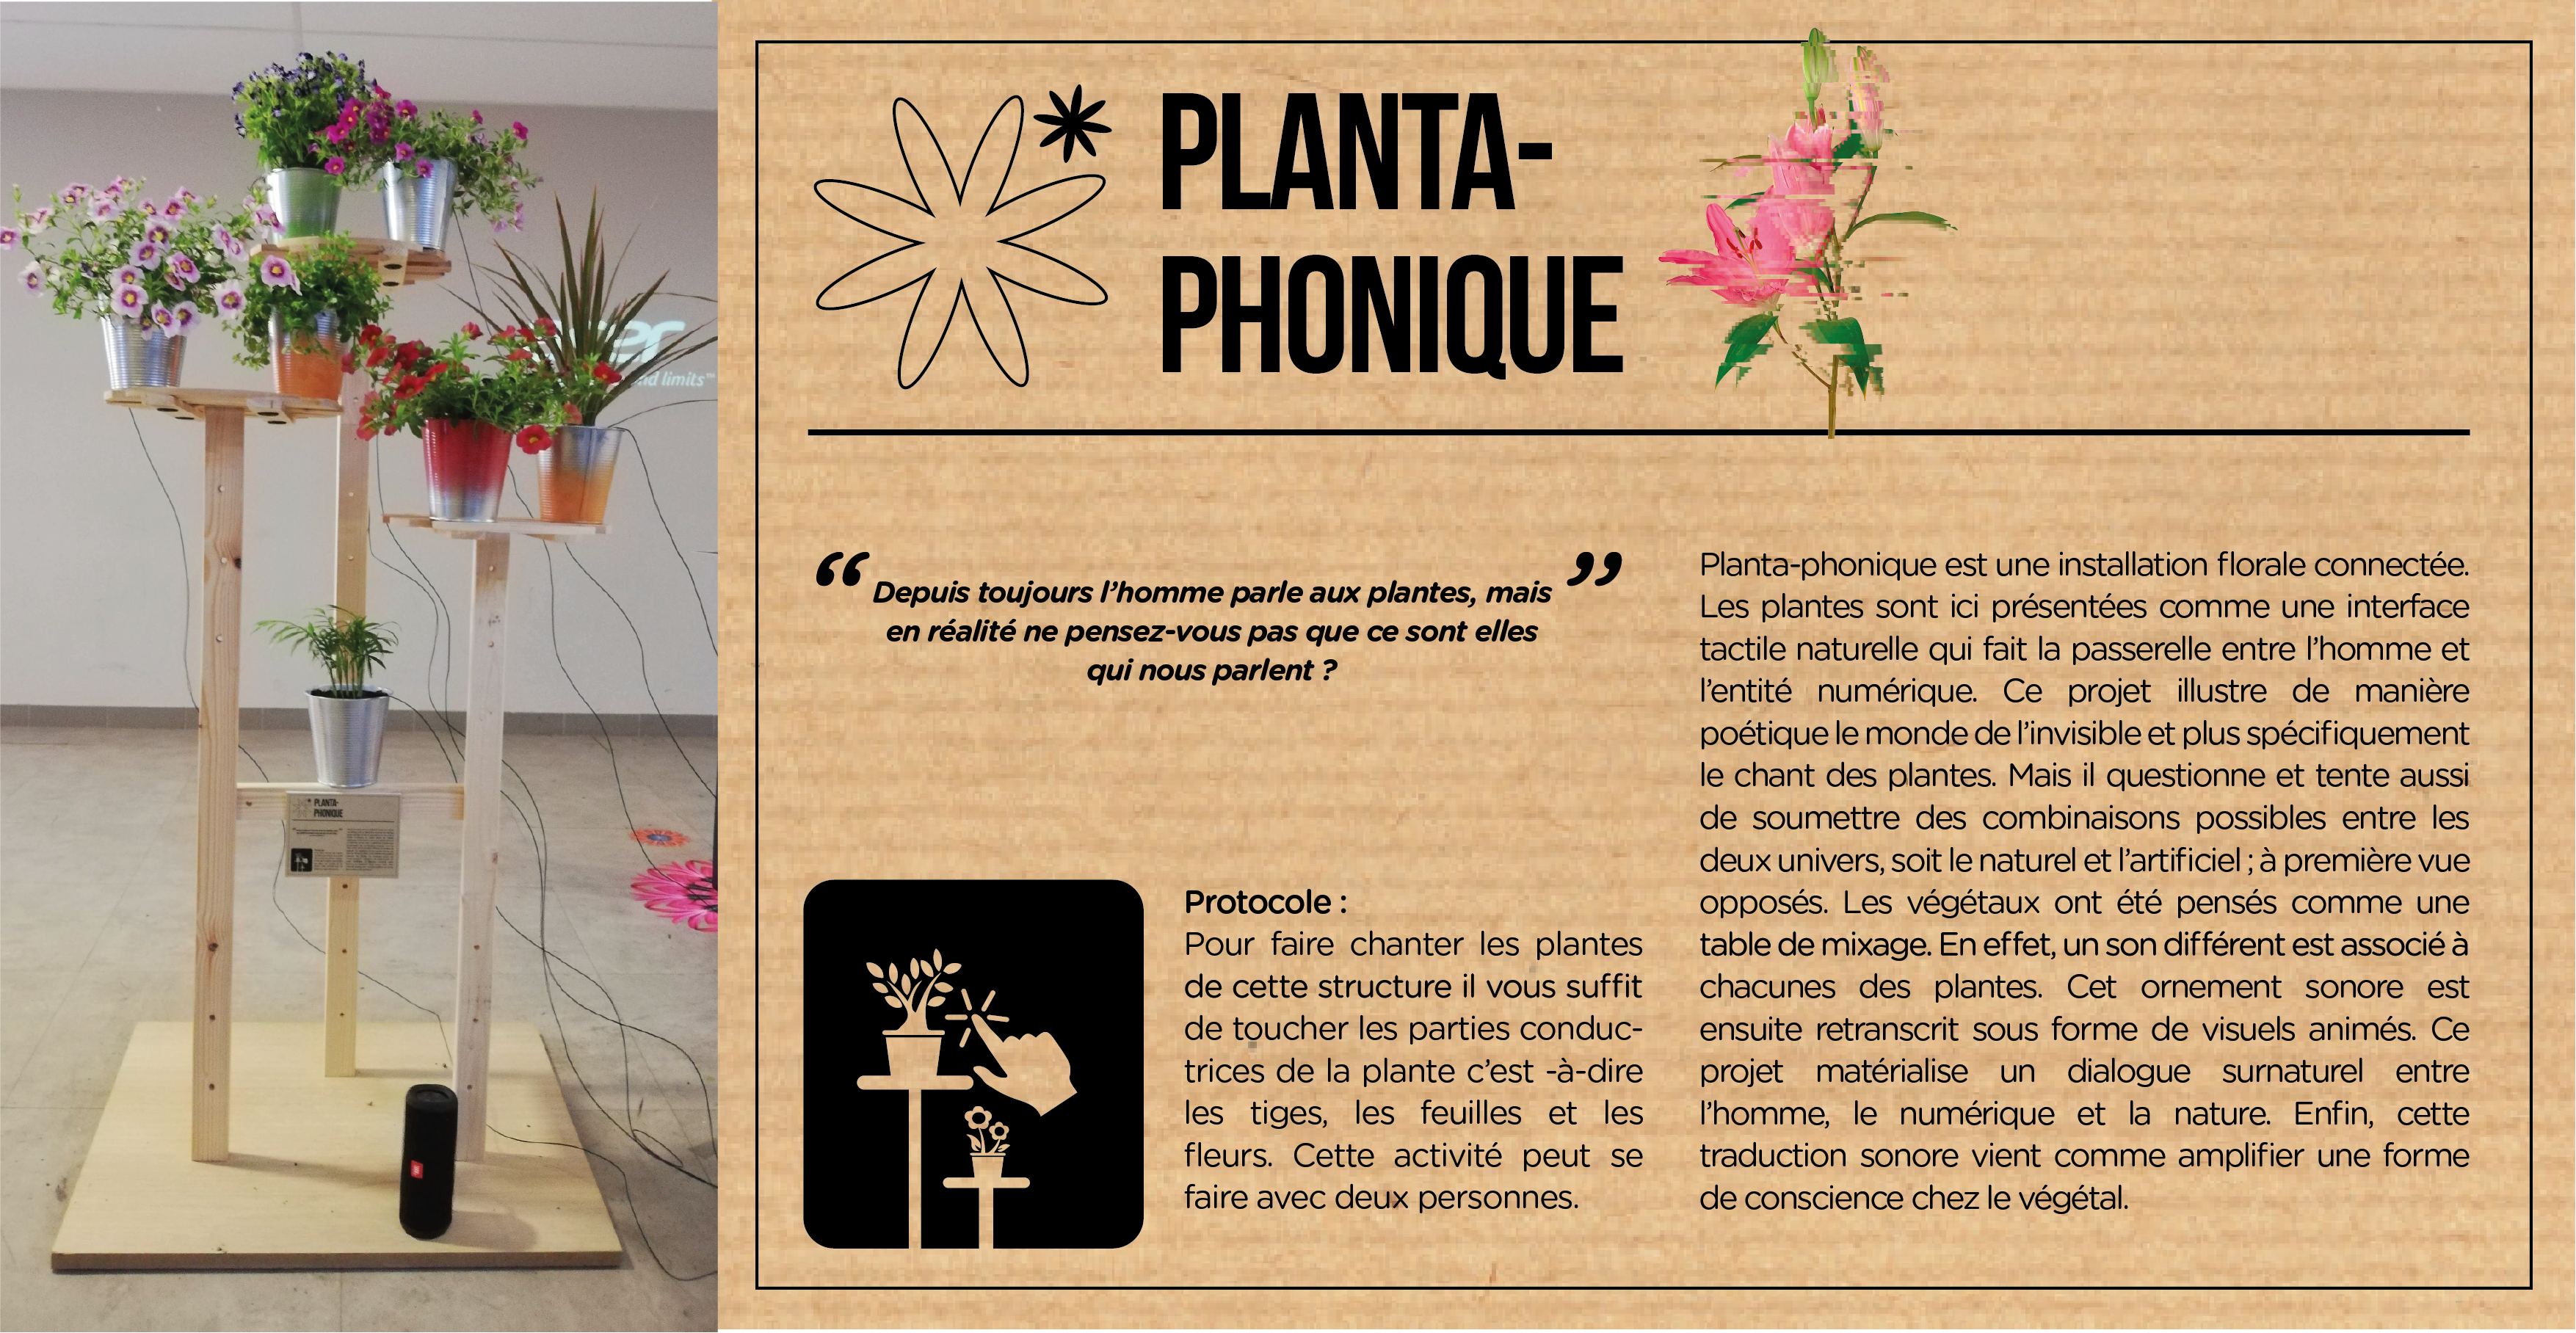
Dans le cadre de mon Macro-projet qui s’articule autour du jardin numérique mon intention a été de concevoir un cabinet de curiosité dans lequel le spectateur serait confronté à plusieurs expérimentations autour de la thématique de la plante digitalisée. L’expérimentation dont je vais vous expliciter s’intitule « Planta-phonique ». Cette expérimentation a germée tout d’abord avec cette envie de rendre visible l’invisible comme par exemple entendre le son d’une rose qui pousse.
Objectifs :
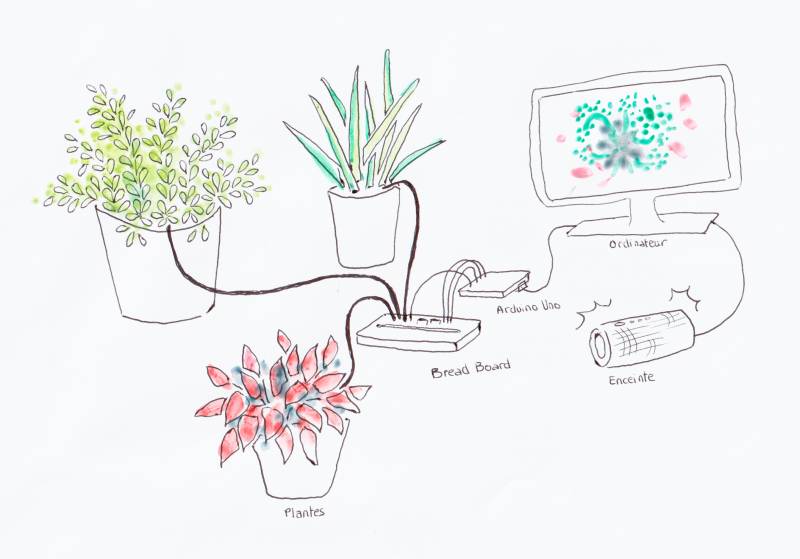
L’objectif de mon expérimentation est d’intégrer la part du vivant dans mes réalisations quelle soit humaine ou végétale. Pour ce faire, j’ai souhaité confectionner une table de mixage qui produit du son et envoie de la vidéo par des interactions avec la main. Cette table de mixage est entièrement composée de plantes dont chacune, un son et une vidéo peut lui être associés. Cette installation rend audible et visible le chant des plantes. Les plantes agissent ici comme une interface.
Références :
Pour ce projet je me suis inspirée de Jean Thoby un pépiniériste qui voue une véritable passion pour le monde végétale. Jean Thoby avec l’aide d’ingénieurs, ont créer un instrument de musique. Par un système de boitier et de câbles (l’un fixé au sol et l’autre accroché à la plante) ils ont réussit à mesurer la résistance électrique afin de réaliser une traduction sonore de l’activité interne du vivant. Cette création renvoie l’illusion d’une forme de vie par un ornement sonore étrange. Cette partition végétale teintée de variations, de notes secondaires et de rythmes déstructurés retranscrit de manière métaphorique l’état de santé des plantes.
Protocole pour 8 plantes:
Installation:
 Une fois les câbles bien branchés sur la BreadBoard, insérer les trois autres fils dans les plantes. Vérifiez bien que la terre est assez humide pour que les plantes puissent être conductrices.

À Télécharger :
Télécharger les librairies :
- Vidéo
- Sound
- Serial
Problèmes récurrents :
- Vérifier si c'est bien le bon port série.
- Si vous utilisez un mac laissez charger le programme pendant plusieurs minutes.
- Attention aux vidéos et musiques trop lourdes.
- Et si le programme ne marche toujours pas, vérifiez l'état de la connectique : les fils ne sont peut-être plus conducteurs ou la résistance n'est peut-être pas la bonne ?
Code:
1 ⇒ Processing : test_7plantes_sonores > Gestion_interactivite.pde
/** Plante sonore - Justine Gendreau
 *  Programme Muti */
/// librairies
import processing.sound.*;
import processing.video.*;
import processing.serial.*;


// variables globales
PImage im; // une image
SoundFile[] son; // un son - un seul lecteur CD audio
Movie vid; // une vidéo - un seul lecteur DVD vidéo

// bouton image active ? // est-ce que l'image est active ? Si oui, on affiche l'image
boolean animation_active = false; // true ou false (2 valleurs possibles) => 1 bit (0 ou 1)

// bouton son actif ?
boolean son_actif = false;
float tempsDebutSon = 0; // temps du début de la musique a été joué

// bouton videos active ?
boolean video_active[];

/// dialogue avec la carte Arduino
Serial myPort;  // Create object from Serial class
int  inBuffer;      // Data received from the serial port
int donneePortSerie; // entier converti de la chaine de caractère reçue sur le port série

// seuil de détection
float seuil = 300;

// port serie
int nPlantes = 8;///////////////////// METTRE LE BON NOMBRE DE CAPTEURS ///////////////
int[] serialInArray = new int[nPlantes];    // Where we'll put what we receive
int serialCount = 0;                 // A count of how many bytes we receive
int[] plante;                 // valeur lue pour chaque plante via le port série et Arduino
boolean firstContact = false;        // Whether we've heard from the microcontroller

// média associés aux plantes
String[] nomSonPlante;
String[] nomvideosPlante;


void setup() { // initialisation des paramètres d'affichage & chargement des sons, vidéos, etc.
  size(1300, 860);
  noStroke();
  background(0);

  // initialisation des variables globale
  im = loadImage("images/chien.jpg");

  // création et initialisation de tableau de valeur "plantes"
  plante = new int[nPlantes];
  for (int i=0; i<nPlantes; i++) {
    plante[i] = 0;
  }

  // son des plantes
  nomSonPlante = new String[nPlantes];
  //for (int i = 0; i<nPlantes; i++) {
  //  nomSonPlante[0] = "sons/inst"+(i+1) + ".mp3";
  //}
  nomSonPlante[0]= "sons/inst1.mp3";
  nomSonPlante[1]= "sons/inst3.mp3";
  nomSonPlante[2]= "sons/silence.mp3";
  nomSonPlante[3]= "sons/inst4.mp3";
  nomSonPlante[4]= "sons/inst5.mp3";
  nomSonPlante[5]= "sons/inst6.mp3";
  nomSonPlante[6]= "sons/inst7.mp3";
  nomSonPlante[7]= "sons/inst8.mp3";

  // chargement des sons
  son =new SoundFile[nPlantes];
  for (int i=0; i<nPlantes; i++) {
    son[i] = new SoundFile(this, nomSonPlante[i]);
  }

  // videos des plantes
  nomvideosPlante = new String[nPlantes];
  nomvideosPlante[0]= "videos/noir.mp4";
  nomvideosPlante[1]= "videos/noir.mp4";
  nomvideosPlante[2]= "videos/plante.mp4";
  nomvideosPlante[3]= "videos/noir.mp4";
  nomvideosPlante[4]= "videos/noir.mp4";
  nomvideosPlante[5]= "videos/noir.mp4";
  nomvideosPlante[6]= "videos/noir.mp4";
  nomvideosPlante[7]= "videos/noir.mp4";

  video_active = new boolean[nPlantes];
  for (int i=0; i<nPlantes; i++) {
    video_active[i]=false;
  }


  //println(son.duration());

  // chargement de la videos
  vid = new Movie(this, "videos/affiche.mp4");

  /// Port série
  // Print a list of the serial ports, for debugging purposes:
  printArray(Serial.list());

  String portName = Serial.list()[2];
  myPort = new Serial(this, portName, 9600);
}

void draw() {


  // print the values (for debugging purposes only):
  println("plante[0]=" +plante[0] + "  plante[1]=" +plante[1]  + "  plante[2]=" +plante[2]+ "  son[0].isPlaying()=" + son[0].isPlaying()
    + "  plante[3]=" +plante[3]  // + "\t" +"plante[4]= " +plante[4]  + "\t" +"plante[5]= " +plante[5]  + "\t" +"plante[6]= " +plante[6]  + "\t" + "plante[7]= " +plante[7] + "\t"
    + "  video[0]=" + video_active[0]+ " video[1]= " + video_active[1]  + "  video[2]= " + video_active[2] + "  video[3]= " + video_active[3]);

  //printArray(plante);
  //printArray(video_active);

  ///////////////////////// interactivités liées aux plantes
  for (int i=0; i<nPlantes; i++) { // pour chacune des plantes
    gestionSonPlante(i);
    gestionVideoPlante(i, nomvideosPlante[i]);
  }

  //// affichage de la vidéo si la vidéo i est active ////////////////////////////////////////
  boolean une_video_active=false;
  for (int i=0; i<nPlantes; i++) {
    une_video_active = (une_video_active || video_active[i]);
  }

  if (une_video_active) {
    image(vid, 0, 0, width, height);
  } else {
    background(0); // fond noir
  }


  // affichage de l'animation//////////////////////////////////////
  //if (animation_active) {
  //  lancerAnimation();
  //}
}
2 ⇒ Processing : test_7plantes_sonores > test_7plantes_sonores.pde
///////////////////////////////// Plante /////////////////////////////////////////////////////
void gestionSonPlante(int i){

  if (plante[i]==255  && !son[i].isPlaying()) { // si la plante i est active
    // lancer le son associé à la plante i en boucle
    son[i].loop();
  }
  else if (plante[i]== 0 && son[i].isPlaying()){
    son[i].stop();
  }
  // animation de la plante i

}

//////////////////////////////////////////////// Video ///////////////////////////////////////////////////
void gestionVideoPlante(int i, String nomVideo) {
  if (plante[i]==255  && !video_active[i]) {  // video
    // jouer le son SSI la distance est inférieur à un seuil, strictement supérieure à 0 et si la vidéo ne joue pas déjà
    // lancement du son
    lancerVideo(i, nomVideo);
  } else if (plante[i]==0 && video_active[i]) { //si la distance est supérieure au seuil ET que la video joue : arrêter la video
    vid.stop();
    clear();
    video_active[i] = false;
  }
}
void lancerVideo(int i, String nomVideo) {
  if (video_active[i] == false) { // la vidéo 1 ne tourne pas
    // chargement de la video 1
    vid = new Movie(this, nomVideo );
    vid.loop();
    video_active[i] = true;
  }
}
//////////////////////////////////////////////// animation ///////////////////////////////////////////////////
void gestionAnimation() {
  if (donneePortSerie > 100) { // on appuie sur la touche "espace" => lancer l'animation "image"
    animation_active = true;
  } else {
    animation_active = false;
  }
}
void lancerAnimation() {
  float x = 30 + random(-20, 20); // random sur la position
  float y = 30 + random(-20, 20);
  image(im, x, y, 200, 200);
}


////////////////////////////////////// Méthodes ///////////////////////////////
void movieEvent(Movie movie) { //// gestion de la vidéo
  vid.read();
}
3 ⇒ Processing : test_7plantes_sonores > SerialEvent.pde
void serialEvent(Serial myPort) {
  // read a byte from the serial port:
  int inByte = myPort.read();
  // if this is the first byte received, and it's an A,
  // clear the serial buffer and note that you've
  // had first contact from the microcontroller.
  // Otherwise, add the incoming byte to the array:
  if (firstContact == false) {
    if (inByte == 'A') {
      myPort.clear();          // clear the serial port buffer
      firstContact = true;     // you've had first contact from the microcontroller
      myPort.write('A');       // ask for more
    }
  } else {
    // Add the latest byte from the serial port to array:
    serialInArray[serialCount] = inByte;
    serialCount++;

    // If we have 3 bytes:
    if (serialCount > nPlantes-1 ) {
      for (int i=0; i<nPlantes; i++) {
        plante[i] = serialInArray[i];
      }
      //plante[0] = serialInArray[0];
      //plante[1] = serialInArray[1];
      //plante[2] = serialInArray[2];
      //plante[3] = serialInArray[3];
      //plante[4] = serialInArray[4];
      //plante[5] = serialInArray[5];
      //plante[6] = serialInArray[6];
      //plante[7] = serialInArray[7];

      // print the values (for debugging purposes only):
      //println("plante[0]= " +plante[0]  + "\t" + "plante[1]= " +plante[1]  + "\t" + "plante[2]= " +plante[2] );

      // Send a capital A to request new sensor readings:
      myPort.write('A');
      // Reset serialCount:
      serialCount = 0;
    }
  }
}
</code>
4 ⇒ Arduino : test_7plantes_sonores.ino.ino
//Import a library from the Arduino folder
#include <CapacitiveSensor.h>
/////////////////////////////// METTRE LE BON NOMBRE DE CAPTEURS /////////
byte Ncapteurs = 8;

//Select the two pins that will act as a capacitor
CapacitiveSensor   cs_2[] = {CapacitiveSensor(2, 3),// 10M resistor between pins 2 & 4, pin 2 is sensor pin, add a wire and or foil if desired
                             CapacitiveSensor(2, 4),// 10M resistor between pins 2 & 6, pin 6 is sensor pin, add a wire and or foi
                             CapacitiveSensor(2, 5),// 10M resistor between pins 2 & 11, pin 8 is sensor pin, add a wire and or foil
                             CapacitiveSensor(2, 6),// 10M resistor between pins 2 & 11, pin 8 is sensor pin, add a wire and or foil
                             CapacitiveSensor(2, 7),// 10M resistor between pins 2 & 11, pin 8 is sensor pin, add a wire and or foil
                             CapacitiveSensor(2, 8),// 10M resistor between pins 2 & 11, pin 8 is sensor pin, add a wire and or foil
                             CapacitiveSensor(2, 9),// 10M resistor between pins 2 & 11, pin 8 is sensor pin, add a wire and or foil
                             CapacitiveSensor(2, 10),// 10M resistor between pins 2 & 11, pin 8 is sensor pin, add a wire and or foil
                            };
long* capSensorVal ; // mémorise la valeur lue sur chaque capteurs

//Insert the minimum value provided by the sensor to detect the touch
int seuilDetection = 500; // seuil de détection sur la valeur donné par le capteur capacitif
const int ledPin = 13;

int* plante ;

// port série
int inByte = 0;

///////////////////// debug //////////////
boolean debug1 = false, debug2 = false;
////////////////////////////////////////////SETUP ////////////////////////////
void setup() {
  // start serial port at 9600 bps:
  Serial.begin(9600);
  while (!Serial) {
    ; // wait for serial port to connect. Needed for native USB port only
  }

  // création des tableaux
  capSensorVal = malloc(Ncapteurs * sizeof(long));
  plante = malloc(Ncapteurs * sizeof(int));
  // initialisation des tableaux
  for (int i = 0; i < Ncapteurs; i++) {
    capSensorVal[i] =  0;
    plante[i] = 0;
  }

  pinMode(ledPin, OUTPUT);
  // init des capteurs capacitifs
  cs_2[0].set_CS_AutocaL_Millis(0xFFFFFFFF);     // turn off autocalibrate on channel 1 - just as an example

  establishContact();  // send a byte to establish contact until receiver responds
}

void loop() {
  // if we get a valid byte, read analog ins:
  if (Serial.available() > 0) {
    // get incoming byte:
    inByte = Serial.read();

    long start = millis();
    for (int i = 0; i < Ncapteurs; i++) {
      capSensorVal[i] =  cs_2[i].capacitiveSensor(30);
    }

    if (debug1) {
      Serial.print(millis() - start);        // check on performance in milliseconds
      Serial.print("\t");                    // tab character for debug windown spacing

      for (int i = 0; i < Ncapteurs; i++) {
        Serial.print(capSensorVal[i]);                  // print sensor output 1
        Serial.print("\t");
      }
      Serial.println("");                // print sensor output 3
    }


    // test des valeurs des capteurs
    for (int i = 0; i < Ncapteurs; i++) {
      plante[i] = testCapteur(capSensorVal[i], seuilDetection);
    }
    if (debug2) {
      for (int i = 0; i < Ncapteurs; i++) {
        Serial.print(plante[i]);                  // print sensor output 1
        Serial.print("\t");
      }
      Serial.println("");                // print sensor output 3
    }
    else {
      // send sensor values: on envoie à Processing l'état de la plante - 0 : inactive; 255 : active
      for (int i = 0; i < Ncapteurs; i++) {
        Serial.write(plante[i]);
      }
    }
  }
}

void establishContact() {
  while (Serial.available() <= 0) {
    Serial.print('A');   // send a capital A
    delay(300);
  }
}

int testCapteur(long sensorVal, long seuilDetection) {
  // sensorVal : valeur du capteur
  // seuilDetection : seuil de détection

  if (sensorVal > seuilDetection ) {
    //Turn on the led
    digitalWrite(ledPin, HIGH);
    // plante i activée
    return 255;
  }
  //Touch undetected
  else {
    //Turn off the led
    digitalWrite(ledPin, LOW);
    // plante i inactivée
    return 0;
  }

}
Intentions : explication du projet et objectifs
Dans le cadre d'un projet avec le musée des Beaux Arts, l'objectif de ce projet est de créer un boîtier interactif permettant de faciliter la compréhension de la perspective dans un tableau.
Plans et schémas de fonctionnement
Programmes
Arduino
Le montage Arduino et le programme associé a pour but de mesurer les valeurs de plusieurs potentiomètres et sliders, d'un bouton et d'un capteur de distance à ultrason et de les envoyer au programme Processing pour traitement. Le code est le suivant : boitier_interactif_arduino.zip
#include "Ultrasonic.h"

Ultrasonic ultrasonic(7); // capteur de distance

int Slider1 = 0;    // Slider 1 : xPerso
byte Slider1Pin = A0;
byte Slider2Pin = A1;   // Slider 2 : yPerso
int Potentiometre1 = 0;    // Potentiomètre 1 : ChoixPerso
byte Potentiometre1Pin = A2;
int Potentiometre2 = 0;    // Potentiomètre 2 : CouleurPerso
byte Potentiometre2Pin = A3;
int ChoixMesureDistance = 0;  // Bouton poussoir - 0 : mesure de distance par slider 2 (yPerso). 1 : Mesure de distance par le capteur de distance
byte boutonPoussoirPin = 2; // broche de lecture du bouton poussoir

int Distance = 0; // distance lue sur le capteur de distance // Attention MeasureInCentimeters() renvoie un type "long"
int inByte = 0;         // incoming serial byte

byte ledPin = 8; // broche de commande de la LED


byte etat_bouton = 0; //La variable « etat_bouton » mémorise l’état HIGH ou LOW de la pate d’entrée
byte old_etat_bouton = 0; //La variable « old_etat_bouton » mémorise l’ancien état de la variable « etat_bouton »
byte etat_led = 0; //La variable « etat_led » mémorise l’état 1 (allumée) ou 0 (éteinte) de la led.

boolean debug = false;
boolean debug_Com_Serial = false;


void setup() {
  // start serial port at 9600 bps:
  Serial.begin(9600);
  while (!Serial) {
    ; // wait for serial port to connect. Needed for native USB port only
  }

  pinMode(boutonPoussoirPin, INPUT);   // digital sensor is on digital pin D2
  pinMode(ledPin, OUTPUT); // LED sur D7
  if (!debug) {
    establishContact();  // send a byte to establish contact until receiver responds
  }
}

void loop() {
  gestionBouton();

  // Si une donnée arrive dans le port série venant de processing = LIre les nouvelles valeurs des différents capteurs
  if (!debug) { // mode normal
    if (Serial.available() > 0) {
      //  lecture de la donnée sur le port série : lettre A
      inByte = Serial.read();
      if (inByte == 'A') { // vérification du caractère envoyé par Processing
        // mesure sur les différents capteurs
        gestionCapteurs();
        // Envoi des valeurs lues sur les différents capteurs vers Processing
       envoiMesureVersProcessing();

        if (debug_Com_Serial) { ///// Debug
          envoiMesureSurPortSerial();
        }
      }
    }
  }
  else { // mode debug
    // mesure sur les différents capteurs
    gestionCapteurs();
    // Envoi des valeurs lues sur les différents capteurs
    envoiMesureSurPortSerial();
    delay(500);
  }
}

void establishContact() {
  while (Serial.available() <= 0) {
    Serial.print('A');   // send a capital A
    delay(300);
  }
}

void gestionBouton() {
  // mesure de l'état du bouton
  etat_bouton = digitalRead(boutonPoussoirPin); // lit et mémorise l’état en entrée de la pate 2

  if ((etat_bouton == LOW) && (old_etat_bouton == HIGH)) {
    // si l’entrée 2 est à l’état LOW (bouton appuyé) et que juste précédemment le bouton est ouvert
    etat_led = 1 - etat_led ; // inverse l’état de la led
    delay(10); // patienter 10ms pour éviter les rebonds avant d’allumer la led
  }
  old_etat_bouton = etat_bouton; // sauvegarde la nouvelle valeur
  ChoixMesureDistance = etat_led ; // choix du capteur de distance Ultrason ou du Slider
  if (etat_led == 1) {//si la led doit être allumée
    digitalWrite(ledPin, HIGH); // allumer la LED
  }
  else { // si la led est éteinte
    digitalWrite(ledPin, LOW); // éteindre la LED
  }
}

void gestionCapteurs() {
  // lecture des données sur les différents capteurs. On divise par 4 pour ramener la valeur entre 0 et 255
  Potentiometre1 = map(analogRead(Potentiometre1Pin), 0, 1023, 0, 3.5); //ChoixPerso : 0, 1, 2 (3 personnages). Attention : on a mis 3.5 car sinon, le déclenchement du 2ième personage s'effectuer trop tardivement
  // delay 10ms to let the ADC recover:
  delay(10);

  Potentiometre2 = analogRead(Potentiometre2Pin) / 4; //CouleurPerso
  // delay 10ms to let the ADC recover:
  delay(10);

  Slider1 = analogRead(Slider1Pin) / 4; // xPerso
  // delay 10ms to let the ADC recover:
  delay(10);

  // lecture de la distance avec le capteur ultrason ou le Slider 2
  if (ChoixMesureDistance == 1) { // Capteur de distance ultrason
    Distance = map(ultrasonic.MeasureInCentimeters(), 0, 400, 0, 255); // mesure de la distanceentre 0 et 400cm et ramener cette valeur entre 0 et 255
  }
  else {
    Distance = analogRead(Slider2Pin) / 4; //yPerso lu sur Slider 2
  }
}

void envoiMesureVersProcessing() {
  Serial.write(Potentiometre1); //ChoixPerso
  Serial.write(Potentiometre2); //CouleurPerso
  Serial.write(Slider1); // xPerso
  Serial.write(Distance);//distance - y Perso
}

void envoiMesureSurPortSerial() {
  Serial.println("");
  Serial.print("etat_led = ");
  Serial.print(etat_led); //etat_led
  Serial.print("   ChoixPerso = ");
  Serial.print(Potentiometre1); //ChoixPerso
  Serial.print("   CouleurPerso = ");
  Serial.print(Potentiometre2); //CouleurPerso
  Serial.print("   xPerso = ");
  Serial.print(Slider1); // xPerso
  Serial.print("   yPerso = ");
  Serial.print(Distance);//distance - yPerso
  Serial.println("");
}
Processing
Programme initial
Le programme Processing a pour but de récupérer les différentes données envoyées par la carte Arduino. Chaque donnée constitue un paramètre d'affichage permettant de sélectionner un personnage, modifier sa position et sa taille dans une image.
Le programme est le suivant : boitier_interactifprocessing_2.zip
import processing.serial.*;

int bgcolor;			     // Background color
int fgcolor=255;			     // Fill color
Serial myPort;                       // The serial port
int NbData = 4; // nombre de données à récupérer de la carte Arduino
int[] serialInArray = new int[NbData];    // Where we'll put what we receive
int serialCount = 0;                 // A count of how many bytes we receive
int xPerso, yPerso, ChoixPerso, CouleurPerso, ChoixMesureDistance, Distance, sPerso;		             // Starting position of the ball
boolean firstContact = false;        // Whether we've heard from the microcontroller
PImage loubon;
PImage bouvier;


void setup() {
  size(1000,570);  // Stage size
  noStroke();      // No border on the next thing drawn
  colorMode(HSB);

  // Initialisation des variables
  ChoixPerso=0; // Potentiomètre 1
  CouleurPerso = 0; //Potentiomètre 2
  xPerso = width/2; // Slider 1
  yPerso = height/2; // Slider 2 - Distance
  sPerso = 250; //Taille du personnage
  bouvier = loadImage("Images/Bouviercarre.png"); //Image du personnage
  loubon= loadImage("Images/Loubon_-_Vue_de_Marseille.jpg"); // Image du fond

  // Print a list of the serial ports, for debugging purposes:
  printArray(Serial.list());

  // I know that the first port in the serial list on my mac
  // is always my  FTDI adaptor, so I open Serial.list()[0].
  // On Windows machines, this generally opens COM1.
  // Open whatever port is the one you're using.
  String portName = Serial.list()[0];
  myPort = new Serial(this, portName, 9600);
}

void draw() { /////////////////////////////////////// r@Lise : ajouter le graphisme...
  background(loubon);
  //fill(fgcolor);
  // Draw the shape
  //ellipse(xPerso, yPerso, 20, 20);

  if (ChoixPerso == 0) {
    bouvier = loadImage("Images/Bouviercarre.png");
  }
  if (ChoixPerso == 1){
   bouvier = loadImage("Images/Arbrecarre.png");
  }
  if (ChoixPerso == 2){
   bouvier = loadImage("Images/Vachecarre.png");
  }
  image(bouvier, xPerso, yPerso, sPerso, sPerso);

}
//for (int i = 0; i < img.pixels.length; i++) {
//  img.pixels[i] = color(0, 90, 102, i % img.width * 2);
//}
void serialEvent(Serial myPort) { // gestion des données envoyées par la carte
  // read a byte from the serial port:
  int inByte = myPort.read();
  // if this is the first byte received, and it's an A,
  // clear the serial buffer and note that you've
  // had first contact from the microcontroller.
  // Otherwise, add the incoming byte to the array:
  if (firstContact == false) {
    if (inByte == 'A') {
      myPort.clear();          // clear the serial port buffer
      firstContact = true;     // you've had first contact from the microcontroller
      myPort.write('A');       // ask for more
    }
  } else {
    // Add the latest byte from the serial port to array:
    serialInArray[serialCount] = inByte;
    serialCount++;

    // If we have NbData bytes:
    if (serialCount > NbData-1) {
      ChoixPerso=serialInArray[0];
      CouleurPerso = serialInArray[1]; //rouge
      xPerso = serialInArray[2]*3-50;
      yPerso = serialInArray[3]+100;
      sPerso = serialInArray[3]*2+100;

      // print the values (for debugging purposes only):
      println(ChoixPerso + "\t" + CouleurPerso + "\t" +  xPerso + "\t" + yPerso);

      // Send a capital A to request new sensor readings: Envoie d'une letter "A" pour signifier à la carte Arduino de renvoyer des données
      myPort.write('A');
      // Reset serialCount:
      serialCount = 0;
    }
  }
}
Programme de test de couleur sur des images en PNG
De manière connexe, des tests sur la manière de modifier la couleur d'un contour SVG/PNG ont été effectués. L'objectif est de pouvoir modifier la couleur d'un contour en jouant sur un potentiomètre, oui ici, avec la sourie.
Le rendu est le suivant :
Le programme Processing est le suivant : test_png_3.zip
/**
 * Create Image.
 *
 * The createImage() function provides a fresh buffer of pixels to play with.
 * This example creates an image gradient.
 */

PImage img, imgIntiale;
color c =color(#192A76);
int r = 25, g = 42, b=118;
// Arbre : 2480*2480
void setup() {
  size(1000, 570);
  background(255);
  imgIntiale = loadImage("Arbrecarre.png");
  img = createImage(imgIntiale.width, imgIntiale.width, ARGB);

  colorMode(HSB);

  //float a = map(i, 0, img.pixels.length, 255, 0);
  //img.pixels[i] = color(0, 153, 204, a);
}

void draw() {
  background(255);
  image(imgIntiale, 0, 0, 250, 250);

  for (int i = 0; i < imgIntiale.pixels.length; i++) {
    int r_i = (imgIntiale.pixels[i] >> 16) & 0xFF;  // Faster way of getting red(argb)
    int g_i = (imgIntiale.pixels[i] >> 8) & 0xFF;   // Faster way of getting green(argb)
    int b_i= imgIntiale.pixels[i] & 0xFF;          // Faster way of getting blue(argb)
    if (r_i == r && g_i == g && b_i == b) {
      float h = map(mouseX, 0, width, 0, 255);
      //float h = 128;
      float s = saturation(imgIntiale.pixels[i]);
      float b = brightness(imgIntiale.pixels[i]);

      //println("h =" + h + " s=" + s + " b=" +b);

      img.pixels[i] = color(h, s, b);
    }
    img.updatePixels();
  }


  image(img, 260, 260, 250, 250);
}
Réalisation de la maquette
vidéos, photos du making of…


